Having just moved to Sydney, I was sitting by the Harbor drinking a beer and a wave of inspiration took over. There came Infinity.
Wind rustles my sails as I float away into the distant harbor
The open ocean pulls me deep and deeper through the long dark hours
The depth of the sea encompasses the all of me
My soul washes away with the waves that have yet to be
Fire ignites on the shores so far far away
The light fades like the sun fades throughout my day
I am lost in a world that does not belong to me
Yet I am one with the vastness of the misunderstood infinity
Tuesday, December 29, 2015
Friday, August 14, 2015
Living on a Tiny Balcony - Creating a Garden Masterpiece
London isn't known for its large apartments with over sized balconies that allow for outdoor dining sets, grills and bikes like many places in the United States. Honestly, I'm lucky to be living somewhere with a balcony at all, not to mention facing a beautiful park. The only downfall to this is that we are a prime location for perching pigeons and the balcony is bland. We (and really I mean me) decided that it would be a great idea to spice it up a little and create a garden masterpiece with colorful flowers, herbs, vegetables and even our very own compost!
After doing some online research for the best ways to utilize small balconies for growing these types of plants, we headed off to the gardening store and went wild.
Step 1: Clean the Balcony (from the pigeon poop - uhh)
Step 2: (The fun part) Begin the planting. We purchased one over the balcony hanger for the flowers, one larger planter for the veggies and one smaller planter for the herbs at the local store to get started and I ordered a couple things from Amazon. We also found a crate on the side of the road that I decided to line with plastic from the compost bags and add herbs and chili's.
Step 3: Build a Tower Garden. I went to the local shop to get some PVC pipe and the tools to cut holes. (see in photo)
Step 4: Build a pallet garden. Create a vertical garden by using an old pallet and cutting it to size and lining with landscape mesh. (You can see step by step(ish) below):
Step 5: The design on the garden. We wanted the balcony to be full of green but still have enough space for two chairs and a small little
table.
This is how it all turned out:
Step 6: Create an Indoor Garden that makes it easier for the most commonly used herbs.

Updates since this was all created:
I was able to grow 3 strawberries, then the plants stopped producing any more. I found the culprit that was eating some of my plants (the entirety of my mixed salad I was trying to grow) and I accidentally killed it instead of letting it go free to turn into a butterfly somewhere else :(. Most of my spinach isn't growing well because it's a cold weather plant. My squash is struggling but I'm hoping the one that's currently growing doesn't die like the last one.
On the plus side:
I have 3 chili's growing, 1 pepper, 4 large tomatoes, and a bunch of cherry tomatoes. All of my herbs are growing pretty strong and the flowers are in full bloom.


I'm proud of my little balcony garden to make our apartment feel more homey :)
After doing some online research for the best ways to utilize small balconies for growing these types of plants, we headed off to the gardening store and went wild.
Step 1: Clean the Balcony (from the pigeon poop - uhh)
Step 2: (The fun part) Begin the planting. We purchased one over the balcony hanger for the flowers, one larger planter for the veggies and one smaller planter for the herbs at the local store to get started and I ordered a couple things from Amazon. We also found a crate on the side of the road that I decided to line with plastic from the compost bags and add herbs and chili's.
Step 3: Build a Tower Garden. I went to the local shop to get some PVC pipe and the tools to cut holes. (see in photo)
Step 4: Build a pallet garden. Create a vertical garden by using an old pallet and cutting it to size and lining with landscape mesh. (You can see step by step(ish) below):
 |
| Break apart and cut the pallet to size |
 |
| Re-position the boards for plant space |
 |
| Attach landscaping mesh and add soil Cut small holes and insert plants |
 |
| Voila, the final product. Next to my homemade compost made out of trashcans. |
Step 5: The design on the garden. We wanted the balcony to be full of green but still have enough space for two chairs and a small little
table.
This is how it all turned out:
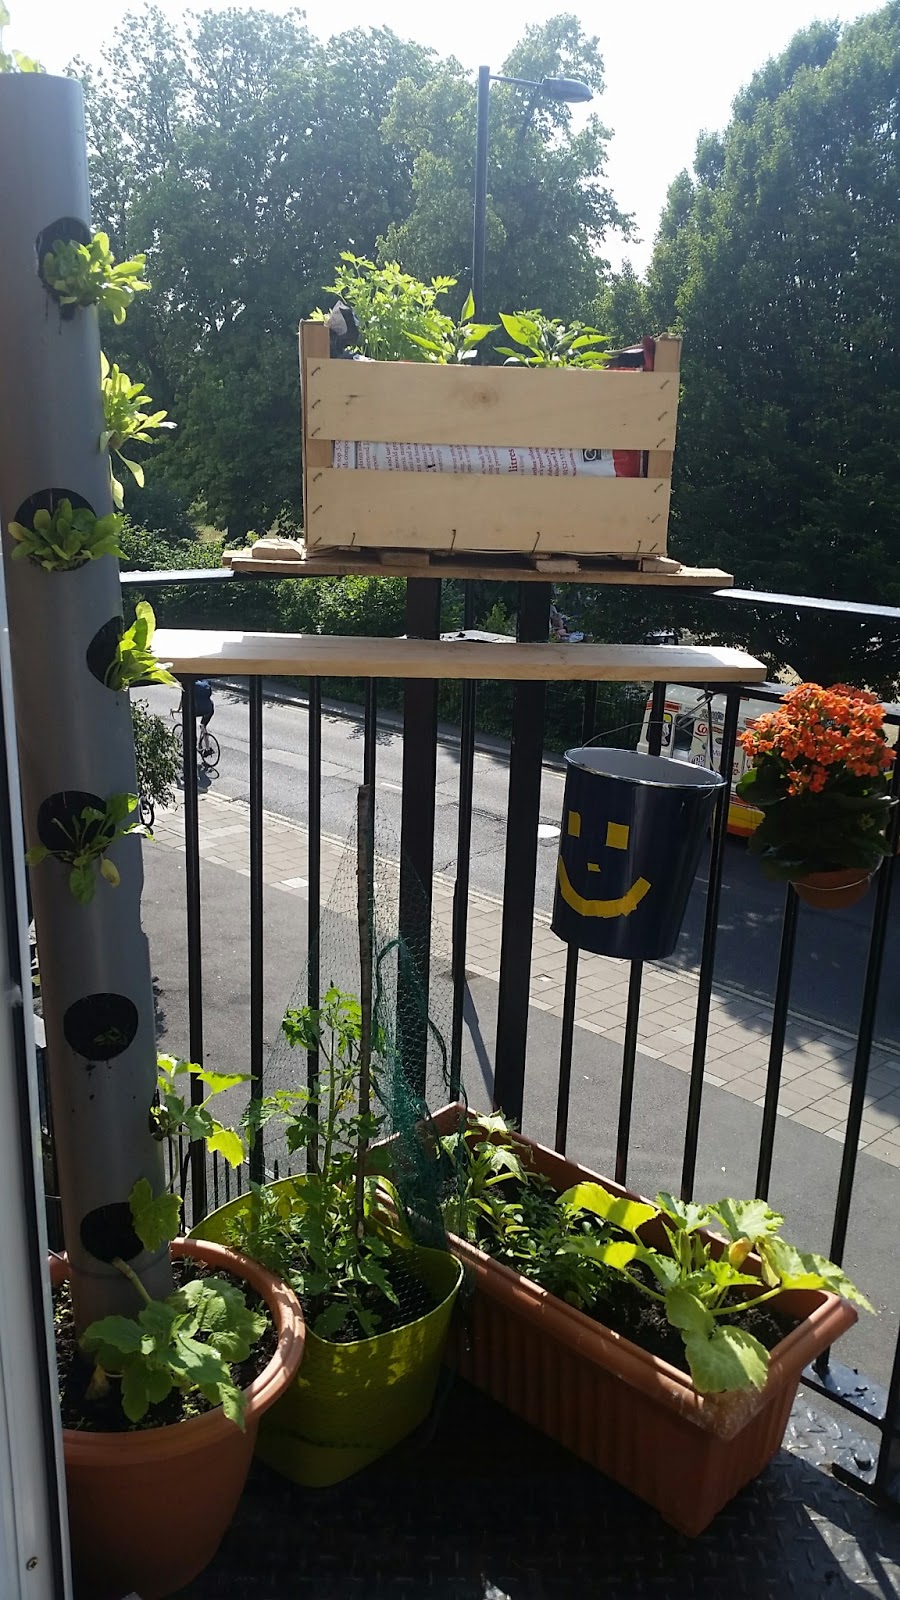 |
| Tower Garden on the left |
 |
| Balcony Garden in the making.. |
 |
| Adding the final touches |
 |
| Two chairs and a table |
 |
| Compost looking good Weird things growing in there... |
 |
| Enjoying the balcony :) |
 |
| Even Oeli loves it! |
Step 6: Create an Indoor Garden that makes it easier for the most commonly used herbs.

Updates since this was all created:
I was able to grow 3 strawberries, then the plants stopped producing any more. I found the culprit that was eating some of my plants (the entirety of my mixed salad I was trying to grow) and I accidentally killed it instead of letting it go free to turn into a butterfly somewhere else :(. Most of my spinach isn't growing well because it's a cold weather plant. My squash is struggling but I'm hoping the one that's currently growing doesn't die like the last one.
On the plus side:
I have 3 chili's growing, 1 pepper, 4 large tomatoes, and a bunch of cherry tomatoes. All of my herbs are growing pretty strong and the flowers are in full bloom.


I'm proud of my little balcony garden to make our apartment feel more homey :)
Monday, June 15, 2015
Living Life in London-town: Part 2 - "You are the only you"
Imagine a world where life seems simple, life seems easy, life seems (pause for effect) GOOD. Well, for the first time in a very long time, that's my life. London feels comfortable, like curling up in your most cherished sweatshirt and pants, snuggled under a blanket watching your favorite movie, snacking on your favorite snack. Much unlike the loathed City of Washington, D.C. that I was stuck in before, dreading every day, London has welcomed me with open arms.
Of course, I'm living the dream: a wonderful man, the best dog in the world, new and old friends, living in a great location and the world at my fingertips. Oh, did I mention that I get to take my time to find the perfect job? All of this does not go without saying how truly blessed I am (in all meaning of the word) to be where I am. I wouldn't change a thing about who I am, what has shaped me to get here or the life I am currently living. This is where I am supposed to be. This feels right.
Of course, I'm living the dream: a wonderful man, the best dog in the world, new and old friends, living in a great location and the world at my fingertips. Oh, did I mention that I get to take my time to find the perfect job? All of this does not go without saying how truly blessed I am (in all meaning of the word) to be where I am. I wouldn't change a thing about who I am, what has shaped me to get here or the life I am currently living. This is where I am supposed to be. This feels right.
Monday, June 1, 2015
Living Life in London-town: Part 1
 [Contrary to popular belief, I was welcomed with sunshine and semi-warm weather.]
It's been two weeks since my arrival. I question where the past two weeks have gone, but I do know they have been filled with laughter, adventure, travel and not to mention, settling in to what will be my home for the next... who knows how long.
Warmly welcomed by an incredible man who has been nothing but a huge support from the beginning, Oeli and I quickly fell in love with what would be our new life.
A couple of pictures from the last two weeks of our new lives that include my goodbye, our welcoming, Italy, outings around London-town and domestication.
 |
| Xussie wondering why she's being disturbed just for me to say goodbye. |
 |
| Daddy dropping me off at the airport. Mom and I didn't get a picture before I left (my fault, I forgot). |
 |
| A warm and heartfelt goodbye with Aunt Faye and Uncle John. |
 |
| A wonderful Welcome to London brunch with Adam, Tom (roomie), plus Kate and Rene!!! |
 |
| Oeli fits right in. |
 |
| Being domestic and creating a balcony garden. |
 |
| Oeli settling in just fine :) |
 |
| All of the wonderful people I've heard so much about welcoming me to London with a Sunday roast! |
 |
| We're silly people. |
 |
| Italian coast... |
 |
| Piggy backing around Italia |
 |
| Adam sneaking in a kiss before the wedding. |
 |
| The beautiful married couple (Lisa and Gerard)! |


 |
| EXPLORATION to an old fortress |
Tuesday, May 5, 2015
Living on that "Natural Homemade Deodorant"
 Hi all!
It's been a while but as you may or may not know, I've been moving to all-natural products over the past year and a half. Natural everything: soap, shampoo (which I will touch on later in a different post), etc., but deodorant has been the very last thing... I was a devout "Secret" user mainly because I LOVED the scent of the deodorant and how it made me smell - but of course it's toxic. After my uncle mentioned something the other day about how he believes store made deodorant actually is the increasing cause of breast cancer, I started doing some research and think it's time that I move away from the chemically induced antiperspirant.

I was a huge skeptic on whether or not the homemade deodorant would work, but after I made my batch (two different styles which I will list below), I was immediately impressed!
I removed the deodorant from my beloved Secret (the one that twists up through the holes and is more "liquid" with still being solid) as well as removing that of a travel Secret solid tube.
I referenced the recipe here (recipe #2) but wanted more of a "Secret" like scent and wanted to make the "sheer-solid" style that would allow me to use that Secret tube.
My recipe to make the "sheer-solid":
Baking Soda (2.5 tbs)
Pure Corn Starch (2.5 tbs) - I used Johnson's Baby Powder pure corn starch with aloe
Vitamin E oil (just a couple drops)
Tangerine essential oil (5-8 drops) - depending on your preference
Lemon essential oil (5-8 drops) - depending on your preference
Thieves essential oil (4-5 drops) - Thieves is strong so be careful not to overpower
Pure Coconut Oil (2 tbs)
I played around a little with the Corn Starch and Baking Soda to create the right consistency. This helped make it almost like a thick batter that easily went into the tube and when turned, came out almost like the Secret did, with a bit of a different consistency but still worked. I wish I could describe the exact consistency, but think of a good thick pancake batter.
For the more solid (regular deodorant stick), I just added more corn starch and baking soda to the mix and packed it in the tube once it became a more solid consistency. *note: it will break apart until pressed together because of the added corn starch and baking soda*

So happy I found this recipe and I highly recommend it, with whichever scent you personally choose! But please make sure you're using high quality pure essentials oils. :)
Subscribe to:
Posts (Atom)